shabby background

Monday, August 15, 2022

TGIF Challenge 381


For this week’s TGIF Challenge 381, I chose a Faux Side-Step fun-fold card. This card is a relatively easy card with a more complicated look.  I've used the Santa Express Designer Series Paper from the July-December Mini Catalog; I love the sweet, yet vibrant the color pallette from this DSP.  

Other supplies used are: Poppy Parade, Basic White, & Evening Evergreen cardstocks; the Whimsical Woodland 3D  Charming Landscapes Embossing Folders, Adhesive-Backed Seasonal Sequins, "Happy Christmas" sentiment from Joyful Flurry Cling Stamp Set, and some Bakers' Twines from my stash. 


The measurements for this card are:
1. White Cardstock cut at 5-1/2" x 8"; scored along the long side at: 3", 6", and 7".
     The folds are Mountain at the #" line, Valley at the 6", and Mountain at the 7".
2. I prefer my borders to be 1/8" versus 1/4" so my  DSP is cut: 2-7/8" x 5-3/8" and 7/8" x 5-3/8".
3.  The "faux step" piece of cardstock measures 3" x 8-1/2", scored along the long edge at 4-1/4".  
     This piece is next embossed.  Because my folder is directional, I embossed only the front section.
4.  My packages are: 1-5/8" square from Eveing Evergreen that was embossed using Charming
      Landscapes;  1-3/16" square from polka dot DSP, & 1" x 7/8" from striped DSP. I hand-tied the 
      Bakers' Twines.       

Embossing Folders: Charming Landscapes, 159593 & Whimsical Woodland 3D, 159831
Stamps: Joyful Flurry: 159804
Cardstocks: Poppy Parade:119793; Basic White: 159276; & Evening Evergreen: 155574.
DSP: Santa Express: 159582
Embellishment: Adhesive-Backed Seasonal Sequins, 159964


Monday, July 11, 2022

Challenge Time!

 #TGIFC376

It’s been a while since I entered a challenge so I thought it about time!  While cruising Instagram a couple days ago I came upon another artist's entry for the TGIF Challenge.  This is the challenge sketch for this week:

And here is my card.  I wanted to use the darling new stamp set from the July/August Mini Catalog called North Pole Mischief - I love stamps featuring silly cats!  First I stamped my cat & fish bowl on Basic White cardstock using Memento Black ink & colored in these cute characters using a combination of Blends Alcohol Markers and Stampin Inks using a Water Pen.  Next, I played around with circle die cuts in White and Real Red but just didn't like how the fish or cat looked against these colors.  I stamped & die cut the trees (stamp set from the Mini Catalog, dies Free from the Sale-A-Bration) and again struggled with placement.  I finally settled on circle die cuts from the mottled green "B" side from one piece of Boughs of Holly Designer Series Paper; the "A" side is the beautiful Poinsettias.  The background is another piece from this same DSP. 
I really struggle with photograph colors on this blog - the pictures on my camera are much brighter and lovelier as opposed to the darker look seen here!  I can send the same pictures to my social media and they look great - hopefully soon I can figure out what to do differently! 


PRODUCTS USED:
From the new July/August Mini Catalog:
  • North Pole Mischief, Item #159770
  • Trees For Sale, Item #159785
  • Boughs of Holly Designer Series Paper, Item #159600
FREE Item from Sale-A-Bration:
  • Tree Lot Dies, Item #159938
Red Bling: retired glitter gems from my stash

From the 2022-2023 Annual Catalog:
  • Linen Thread, Item #104199
  • Crumb Cake Blends, Item #154882
  • Smoky Slate Blends, Item #154904
  • Balmy Blue Stampin Ink, Item #147105
  • Wink of Stella Clear Glitter Brush, Item #141897
  • CARDSTOCKS: Mossy Meadow(#133676), Old Olive(#100702), Basic White(#159276), and Cherry Cobbler(#119685)  


Saturday, May 28, 2022

My Raspberry Garden, May 2022

 What do you do with a narrow bed (7.75’ x 30”) bed of dirt on the back/South side of the house?  Well, I planted raspberries, of course! The vines are loaded this year.

The ancestors of these raspberry vines date back to my “Nana” who had a huge, full, prolific row of these beautiful & delicious berries. Did I mention raspberries are my favorite berry? 

Here’s the story: Nana gave “starts” called runners from her vines to my Mom who then planted her own huge row of raspberries that we enjoyed in my childhood huge garden. When I got my own place, my Mom passed on starts from her vines to me. years later, after my Mom moved to Oregon, I passed on starts of my vines to her for her new home. Then several years later we moved to So Cal and my sweet Mom mailed, yes mailed,  starts to me. Soon, I had a thriving row that we enjoyed for years & when we moved to a different house I brought 3 vines with me. Those 3 starts have grown into this row. Here’s the ”trick/challenge” for me - keep my husband away from the row!  Raspberry vines are prolific & can be invasive so he likes to “cut them back” or “thin them out” & twice now he has cut or pulled out the new runners/vines that produce the next crop of berries & about killed off my plants! This is why my row has a few bare spots.

I’ve been eating a handful every day for about a week & expect a whole bunch to come on all at the same time very soon-yah!  Our first full yield since the move 4 yrs ago-I’m so excited. 

Look at all those green berries and still new blossoms too!  The local honey bees are very busy here & other parts of the yard. 


Sunday, May 22, 2022

Patio Update:


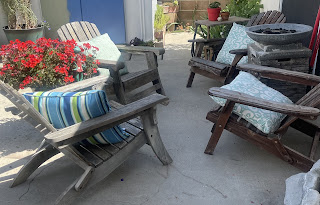
One of the things I wanted to do when I retired was paint these nasty looking, weather beaten, old Adirondack chairs & fix up our patio. Almost 1-1/2 years later & FINALLY tackled the task!  I started on Monday & finished on Wednesday (May 16-19, 2022); Thursday was cleaning out the shed!


Color choices: Rustoleum Seaside & Krylon Coral for a fun beach theme. 
The condition of the chairs required a coat of primer, then 2 cans of the spray paints for each chair!  


 I painted the rust old shed too, in fact painting the doors of the shed is what got this project started! 

The icing on the cake for this project is this new umbrella that has the LED Solar lights!  We love the new look of our patio & look forward to enjoying it. Next project…