shabby background

Wednesday, September 29, 2021

Pretty Hand Penned


Today’s card is a gatefold card featuring a belly band and was made using most of the already cut pieces from my last card class plus a new floral piece. I’ve used one of the beautiful papers from the Hand Penned Designer Series Paper, a floral piece stamped from Hand Penned Petals stamp set & cut out using the Penned Flowers die set. All of these products are featured in the 2021-2022 Stampin’ UP! Annual Catalog. Hop on over to my website to shop at:

https://lyndascarddesigns.stampinup.net/

Monday, September 27, 2021

Monday’s Project-Global Design

 Global Design - Project #311 This week's Global Design Project theme challenge is Leaves.  


Apologies for the Blue fingernails on the lower Right side of this photo - this is my first photo attempt using the camera on my laptop in hopes of getting a better picture color quality.  And I did! Now to work on this more and figure out how to take the pictures without having to hold the card & envelope. But... you can actually see the colors as they really are and see how gorgeous they are!


I love Fall leaves and miss seeing the color changes that happen this time of year in my home state of Washington.  We get a few falling leaves here in Southern California but not the quantity nor do we see the beautiful colors.  However, I can conjur up some gorgeous Fall Leaves from paper and actually made a quite a LOT earlier this month for our church's bulletin board!  With that in mind, my first thought was to puruse my collection of dies and pull out 2 or 3.  Next I wanted to use the "new & happening" cork specialty paper" that I had in my stash.  I cut my cork down to 4-15/16" wide and 3-11/16" high and then adhered that to a pice of Baic Black cardstock(#121045) measuring 5-1/8" wide and 3-13/16" high.  I die cut the leaves from Crumbcake cardstock(#120953) and then using my blending brushes(#153611), colored them to mimic nature using Mango Melody, Pumpkin Pie, Cajun Craze, Old Olive and a hint of Real Red ink pads.  Dies used were: Beautiful Branches (retired) and Sunflowers (#152704).  I used a piece of good ole' copy paper from my printer underneath the dies as I brushed on the colors and once done I was delightfullyy surprised at what I saw.  I loved it so much that I turned my die cut leaves over and "recreated" the look onto a piece of Vanilla cardstock (#101650)then die cut the piece from Stitched So Sweetly (#151690) dies.  I've embellished with the Gold  from Simply Elegant Trim (#155766) and both Black and Gold sequins also from my stash.                                     

The card front was adhered to a piece of Canjun Craze cardstock (#119684) measuring 4-1/4" x 11" and scored at 5-1/2" to create a landscape side folding card.  Meanwhile that gorgeous piece of copier paper is still sitting on my desk and I thought - why not try using this on the envelope and inside the card.  So, I was careful to not only apply the liquid glue but also to carefully spread the glue with my fingers to avoid the "lines" that typically show up with liquid glue and it worked beautifully!  I LOVE the envelop flap, the strip on the front of the envelope and the strip on the inside of the card!  I will definitely us this "stencil" technique again with my die cut pieces!  


You can order any of the products I used from my website at: https://lyndascarddesigns.stampinup.net


Tuesday, September 21, 2021

Global Design Project 310 Entry

Above is the sketch for this week’s Global Design Project Challenge;  this is my card entry:


I started this card with fussy-cutting the darling critters from Sweet Stockings 12” x 12” Designer Series Paper plus a strip from a different piece of the DSP as a background for these guys.  They are so darn cute, especially the pouty cat-right?
My card base plus card front piece are both cut from Cherry Cobbler card stock. I dry embossed the card front using the Pinewood Planks Embossing Folder. The sentiment is from the coordinating stamp set called Sweet Little Stockings. The stamp was inked using Evening Evergreen & styamped onto a scrap of Basic White card stock. The sentiment piece was fussy-cut &  next mounted on a scrap of Cherry Cobbler card stock; lastly, the entire piece was trimmed out. A  sweet little gold bow ties it all up in a pretty little "package".

Here’s a Close up view...


added a bit of the DSP on the inside panel…


Team Pic


I'm  so excited to share that my card was One of Three selected as a Team Pick on last week’s Tic Tac Toe Challenge!


In case you missed my earlier post showing my card, his is the card I entered:


Wednesday, September 15, 2021

New Tim Holtz Embossing Folder


Thank You to a wonderful friend who gave me this Tim Holtz 3-D Embossing Folder yesterday. It is beautiful regardless of which side one chooses. Of course-I just had to play this morning and made this gorgeous card. To get the popped up leaves I simply fussy-cut them out & used the same blending brushes along with Old Olive, Pumpkin Pie, Daffodil, & Cajun Craze Inks to color as I did with the background. I LOVE this card!

Here’s the packaging for Tim Holtz 3-D Texture Fades:  Follage, #665252


Thursday, September 9, 2021

tttc #130


 My Tic Tac Toe Challenge #130 Entry this week’s Grid looks like this:


I chose Left Column/Vertical: Enamel Dots, Die Cuts, & Heat Embossing. 


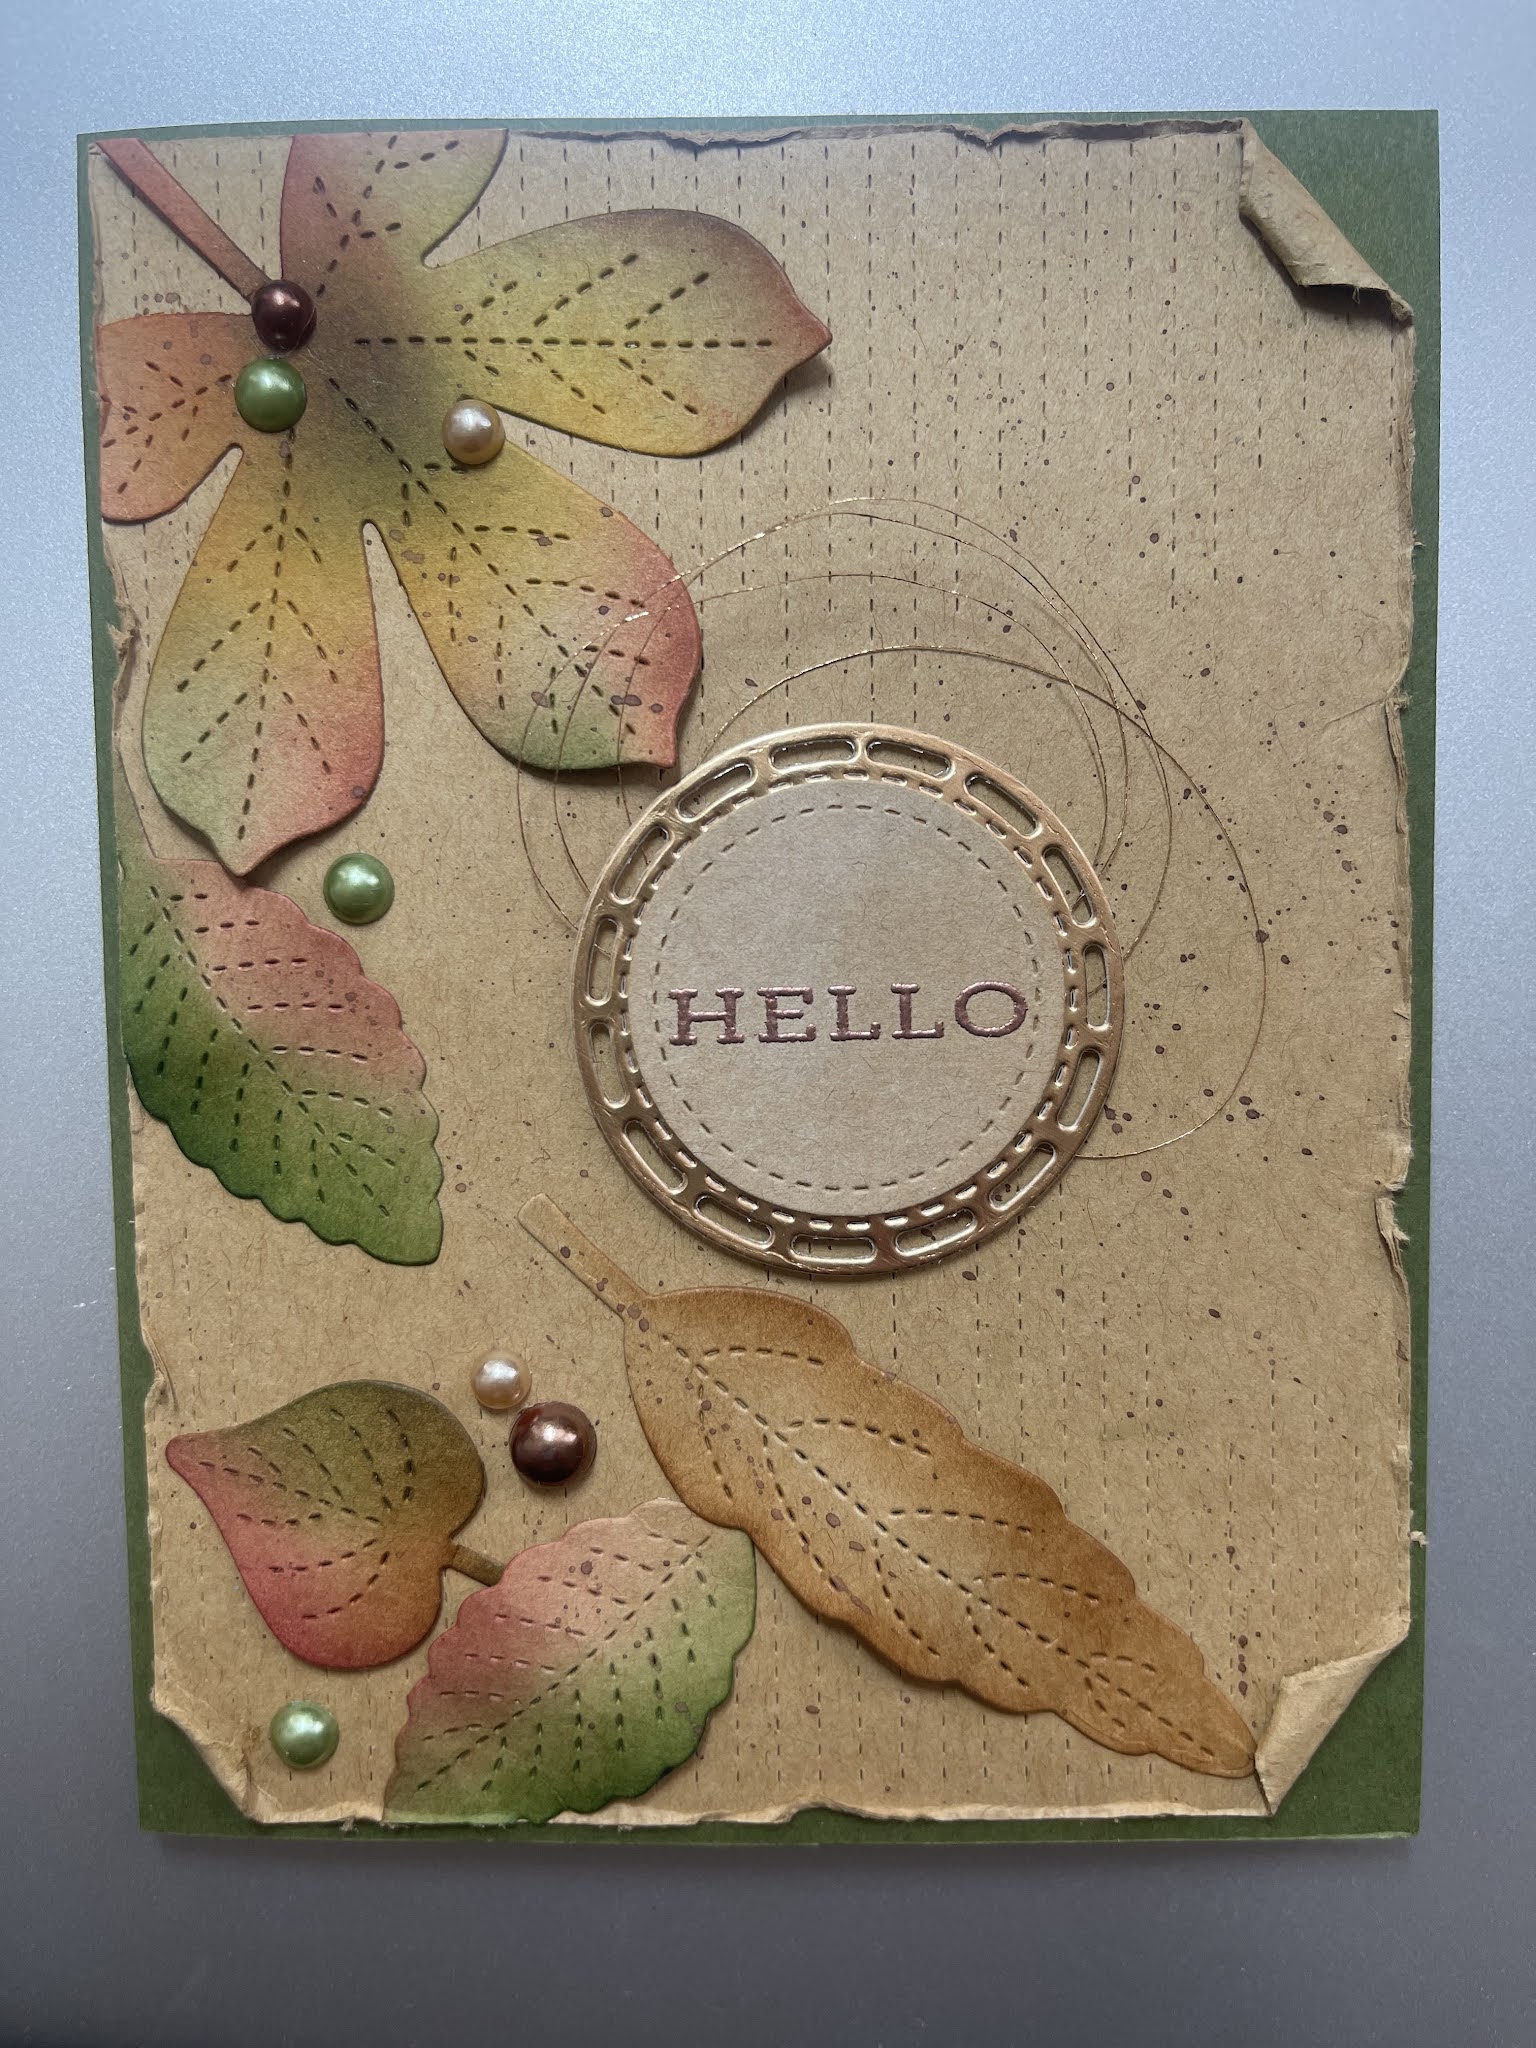
And this is my card:


I started with a 4-3/8" x 5-3/8" piece of crumbcake/Kraft Cardstock for my card front.  I die cut all the leaves using the Stitched Leaves Dies (Item # 153567) and then got out my blending brushes to add  "Falling Leaves" colors to the leaf edges.  The colors I used to create these colorful leaves are: Garden Green, a smidge of Mossy Meadows, Terra Cotta Tile, and a smidge of Cherry Cobbler. 
The Green, Beige, and Copper Enamel Dots are older from my stash as is the Copper Metallic Thread.  

My HELLO sentiment is from the Forever Fern set (Item #152559) and was stamped using Versa Mark then heat embossed in Copper Embossing Powder.  After the embossing technique, the sentiment piece was cut using the smallest circle from an older die set called: Stitched Shapes then matted with a copper backing circle cut from Copper Foil Specialty Paper using the die fron Stitched Labels (Item # 146828).  This piece was popped up using Dimensioals along with a few loops of Copper Thread and adhered to the card front.  

 I used the edge of my Snips Scissors to distress the edges of the card front giving the card front a weathered look.  Mossy Meadow Cardstock  creates a nice comopliment as the cardbase.

I really hoped to catch the Fall Leaves colors - what do you think - did I do it?

#stitchedleaves, #stitchedlabels, #Hello, #fallingleavescard


Tuesday, September 7, 2021

Yesterday’s Tempting/Guessing; Today’s Card...


Here’s the sweet little card I made as a result of yesterday’s taunt!  Isn’t this just too cute???

I saw a post from another Demonstrator using a wreath design with the cat and thought, "I don't have those dies but oh, I do have one of the wreath rings and set out to make my own design.  I've used the  FREE Sale-A-Bration (while supplies last) Be Dazzling 6" x 6" Specialty Paper alog with the Sweet Stockings 12" x 12" Designer Series Paper from the current July-December Mini Catalog.  Also used are: the sentiment fron Poinsettia Petals, Cat from Sweet Little Stockings, Champagne Gems and various dies from my supplies.
What do you think?


BE DAZZLING 6" X 6" (15.2 X 15.2 CM) SPECIALTY PAPER

FREE

Spend $50 or more to get this exclusive Sale-A-Bration item for FREE! You can select your FREE items at checkout.


#poinsettiapetals, #sweetlittlestockings, #bedazzling, 


Monday, September 6, 2021

Guess This Card


Organizing day in my Studio after clothing shopping with our “visiting Grandgirl”, Julia today. 

Needless to say, no card today. This is the beginning of my next card-what do YOU think this will become? Check back tomorrow…


Friday, September 3, 2021

Friday’s “Quick Card”


Here’s my “Quick Friday” card CASE’d from another Demonstrator; my apologies-I do not have her name!                                            I changed up the background papers, added the balloon, used different sentiment & added the bow. Quick & fun for the last day of the week, especially after a very busy morning!

You can get the Counting Sheep stamp set FREE with a $50 purchase plus you can also get the Sheep Dies for a $50 purchase. A $100 purchase gets both for FREE!  Contact me today to place your order!

#counting sheep, #sheepdies, #birthday, #FREEsaleabration